Posted
on 10 September 2009, 19:24,
by Douglas Wilson,
under
Perl.
Apparently jumped the gun on the release and just added another new feature to Nagios::Plugin::OverHTTP and included it in version 0.10. The new feature is actually complementary to the previous new feature. Now if a response is received from the HTTP server that does not indicate the Nagios service status, then not only will it use the default status (which was the previous feature) but it will attempt to make the first line of the message more useful. This idea occurred to me when a service of mine turned to CRITICAL - <HTML> (which is very unhelpful).
If the response is multiple lines and it looks like HTML (like has a HTML, BODY, or HEAD tag), then the script will attempt to find the TITLE tag and put the contents as the first line of the message. If there is no TITLE tag, then it will try looking for a H1 tag.
Posted
on 10 September 2009, 17:29,
by Douglas Wilson,
under
Perl.
A new version of Nagios::Plugin::OverHTTP was just pushed out to the CPAN that includes an additional option: to set what the status will be reported as if the HTTP response did not include a status. If you want the default status to be critical instead of unknown (the previous and current default), just add --default_status=CRITICAL to the command line arguments of the plugin call.
Posted
on 23 August 2009, 14:10,
by Douglas Wilson,
under
Perl.
I am subscribed to the RSS feed for CPAN uploads and watch for new versions of CPAN distributions my modules depend on and read their change logs. The other day I saw Moose 0.89 come out and saw a new feature added where the trigger of an attribute will now receive the old value if there was one.
package Node;

use Moose 0.89;

has child => (
  is  => 'rw',
  isa => 'Node',
  clearer   => 'clear_child',
  predicate => 'has_child',
  trigger   => \&_child_trigger,
);
has parent => (
  is  => 'rw',
  isa => 'Node',
  clearer   => 'clear_parent',
  predicate => 'has_parent',
);

before clear_child => sub {
  my ($self) = @_;

  # Trigger dissociate the parent from the child about to be cleared
  $self->_child_trigger(undef, $self->child);

  return;
};

sub _child_trigger {
  my ($self, $child, $previous_child) = @_;

  if (defined $previous_child) {
    # Remove this node as the parent of the previous child
    $previous_child->clear_parent();
  }

  if (defined $child) {
    # Set this node as the parent of the new child
    $child->parent($self);
  }

  return;
}

no Moose;

1; |
package Node;
use Moose 0.89;
has child => (
is => 'rw',
isa => 'Node',
clearer => 'clear_child',
predicate => 'has_child',
trigger => \&_child_trigger,
);
has parent => (
is => 'rw',
isa => 'Node',
clearer => 'clear_parent',
predicate => 'has_parent',
);
before clear_child => sub {
my ($self) = @_;
# Trigger dissociate the parent from the child about to be cleared
$self->_child_trigger(undef, $self->child);
return;
};
sub _child_trigger {
my ($self, $child, $previous_child) = @_;
if (defined $previous_child) {
# Remove this node as the parent of the previous child
$previous_child->clear_parent();
}
if (defined $child) {
# Set this node as the parent of the new child
$child->parent($self);
}
return;
}
no Moose;
1;
I quickly saw the benefit of this new feature for my Authen::CAS::External distribution and incorporated this into the cas_url and the user_agent attributes. Now the associated LWP::UserAgent always has the proper handlers set up and strange issues where browsing to a CAS page with a user agent object formerly associated with Authen::CAS::External triggering the Authen::CAS::External library will no longer occur.
Posted
on 22 August 2009, 14:59,
by Douglas Wilson,
under
Perl.
In the short time since the first release of Net::SAJAX, there has been three more releases. Version 0.100 changed the call method to now return native Perl data structures instead of JE objects, and so some quirks with using the JE objects as Perl data structures were no more. Version 0.102 introduced a new attribute to the Net::SAJAX object called autoclean_garbage that when enabled (it is disabled by default) will attempt to work around any bad programming on the remote SAJAX page (like PHP warnings appearing before the SAJAX response).
One of the most useful new features in 0.102 is that now all errors are Net::SAJAX::Exception objects. The benefit of this is the ability to handle errors even better.
use 5.008003;
use strict;
use warnings 'all';

use Carp qw(croak);
use English qw(-no_match_vars);
use Net::SAJAX;
use Scalar::Util qw(blessed);

my $sajax = Net::SAJAX->new(
  url => 'http://example.net/directory.php',
);

# Look up a person in the directory
my $people = eval {
  $sajax->call(
    function  => 'SearchDirectory',
    arguments => [$first_name, $last_name],
  );
};

if ($EVAL_ERROR) { # Remember, $EVAL_ERROR cam from the English module
  # An error occurred
  if (blessed $EVAL_ERROR && $EVAL_ERROR->isa('Net::SAJAX::RemoteError')) {
    # The server sent an error message, like "Access Denied"
    show_error($EVAL_ERROR->message);
  }
  elsif (blessed $EVAL_ERROR && $EVAL_ERROR->isa('Net::SAJAX::JavaScriptEvaluation')) {
    # Some error occurred while evaluating the JavaScript
    # Perform some clean up to the JS because you know that the
    # site returns bad JS sometimes.
    $people = my_own_js_eval($EVAL_ERROR->javascript_string);
  }
  else {
    # Don't know what this error is, so throw it again
    croak $EVAL_ERROR;
  }
}

print "Found the following people:\n";

# Loop through each person and print
foreach my $person (@{$people}) {
  printf "%s, %s: %s\n",
    $person->{last_name   },
    $person->{first_name  },
    $person->{phone_number};
}

sub my_own_js_eval {
  my ($javascript) = @_;

  # Do something with the JavaScript here

  return [];
}
sub show_error {
  my ($message) = @_;

  print {*STDERR} "Received $message from the server!\n";

  exit 1;
}

exit 0; |
use 5.008003;
use strict;
use warnings 'all';
use Carp qw(croak);
use English qw(-no_match_vars);
use Net::SAJAX;
use Scalar::Util qw(blessed);
my $sajax = Net::SAJAX->new(
url => 'http://example.net/directory.php',
);
# Look up a person in the directory
my $people = eval {
$sajax->call(
function => 'SearchDirectory',
arguments => [$first_name, $last_name],
);
};
if ($EVAL_ERROR) { # Remember, $EVAL_ERROR cam from the English module
# An error occurred
if (blessed $EVAL_ERROR && $EVAL_ERROR->isa('Net::SAJAX::RemoteError')) {
# The server sent an error message, like "Access Denied"
show_error($EVAL_ERROR->message);
}
elsif (blessed $EVAL_ERROR && $EVAL_ERROR->isa('Net::SAJAX::JavaScriptEvaluation')) {
# Some error occurred while evaluating the JavaScript
# Perform some clean up to the JS because you know that the
# site returns bad JS sometimes.
$people = my_own_js_eval($EVAL_ERROR->javascript_string);
}
else {
# Don't know what this error is, so throw it again
croak $EVAL_ERROR;
}
}
print "Found the following people:\n";
# Loop through each person and print
foreach my $person (@{$people}) {
printf "%s, %s: %s\n",
$person->{last_name },
$person->{first_name },
$person->{phone_number};
}
sub my_own_js_eval {
my ($javascript) = @_;
# Do something with the JavaScript here
return [];
}
sub show_error {
my ($message) = @_;
print {*STDERR} "Received $message from the server!\n";
exit 1;
}
exit 0;
Posted
on 14 August 2009, 15:29,
by Douglas Wilson,
under
Perl.
I have created and uploaded a new module to the CPAN today: Net::SAJAX. This module came about because I am writing private modules that interact with some public applications that utilize the SAJAX library. Please note, though, that this is a horrible library. It is only really functional in PHP, even though the creators name off many other languages it can be used with. Instead of duplicating this code in multiple modules of mine, I wrapped it up in its own library and released it for other people to use.
The module itself was engineered based on looking over the source code of the server-side and client-side source code for SAJAX version 0.12. Even though some of it I feel is bad, I wanted it to match how the SAJAX client code actually works. Due to the horrible fact that SAJAX just responds back with actual JavaScript code, I had to use the Perl module JE to parse and execute the code to be the most compatible.
#!/usr/bin/env perl

use 5.008003;
use strict;
use warnings 'all';

use Net::SAJAX 0.001;

# Get the first and last name to search for from command line
my ($first_name, $last_name) = @ARGV[1,2];

# Create a SAJAX object
my $sajax = Net::SAJAX->new(
  url => 'http://example.net/directory.php',
);

# Look up a person in the directory
my $people = $sajax->call(
  function  => 'SearchDirectory',
  arguments => [$first_name, $last_name],
);

print "Found the following people:\n";

# Loop through each person and print
foreach my $person (@{$people}) {
  printf "%s, %s: %s\n",
    $person->{last_name   },
    $person->{first_name  },
    $person->{phone_number};
}

exit 0; |
#!/usr/bin/env perl
use 5.008003;
use strict;
use warnings 'all';
use Net::SAJAX 0.001;
# Get the first and last name to search for from command line
my ($first_name, $last_name) = @ARGV[1,2];
# Create a SAJAX object
my $sajax = Net::SAJAX->new(
url => 'http://example.net/directory.php',
);
# Look up a person in the directory
my $people = $sajax->call(
function => 'SearchDirectory',
arguments => [$first_name, $last_name],
);
print "Found the following people:\n";
# Loop through each person and print
foreach my $person (@{$people}) {
printf "%s, %s: %s\n",
$person->{last_name },
$person->{first_name },
$person->{phone_number};
}
exit 0;
Essentially the SAJAX request works by sending the following parameters via. query for GET requests and POST data for POST requests:
- rs
- The name of the registered function on the server-side.
- rst
- The target element ID for the element on the web page. I am not sure why this is even sent, as the underlying registered function does not see this parameter.
- rsrnd
- A random value. This is an old way to help defeat a cache since the URL is different even if the same function and parameters are requested.
- rsargs[]
- This contains one argument and is directly given to the registered function. For two arguments, the key just appears twice, like
rsargs[]=first_arg&rsargs[]=second_arg.
The server will then respond in a pretty bad format. The format of the response matches the following regular expression: m{\A \s* ([+-]) : (.*?) \s* \z}msx. This is actually what is seems like they intended, but due to sloppy client-side programming, it is actually less restrictive than that. The client side actually checks if the first character is a minus sign and the rest is just an error string to alert, but any other character is considered a success and the rest of the response is just put in a JavaScript eval(). This bad behavior is mimicked in my library in case they decide to change the server-side response since their client-side does that.
Posted
on 12 August 2009, 16:54,
by Douglas Wilson,
under
Perl.
A new version of Authen::CAS::External has now been uploaded to the CPAN. It brings with it a new improvement where it can now authenticate against a CAS server that does not redirect the client back to the service using the Location header field in the HTTP response, but instead uses an anchor link on the page. Even though this is not wanted for programming access, this is valid according to section 2.1.4 of the protocol.
This modification was made and pushed out today because at the university I attend, the University of South Florida, the CAS server on campus has changed to presenting a warning message to a user when they log in if their password is about to expire and they must click on an anchor link at the bottom to continue to the service.
One other improvement made to the distribution is the inclusion of more documentation! This is welcome, as I really hate to come across modules which seem to have just about zero documentation.
Posted
on 23 June 2009, 18:48,
by Douglas Wilson,
under
Perl.
I have uploaded a new module to the CPAN: Authen::CAS::External. Yes, the module was actually uploaded a while ago, but I have not gotten around to writing about it until now. This module performs authentication against a CAS server on behalf of a user. Currently the module only supports simple authentication using a username and password or using an already authenticated ticket granting cookie.
The main purpose of this module is not really for web scrapers, as they can easily just fill in the form with a username and password and proceed onward, but for more specific uses of the CAS service by third party clients. A use case I am using this module for is to authenticate with the CAS server with a username and password and get the ticket for a specific service, which I can then use to gain access to the service with that username and password on an entirely separate browsing session.
There is one more scenario I use this module for, and that is to authenticate against the CAS server, and then hand over the ticket granting cookie to another process which can then log into services using that CAS server without ever knowing the username and password.
#!/usr/bin/env perl

use 5.008001;
use strict;
use warnings;

use Authen::CAS::External 0.01;
use URI;

my $authen_server = Authen::CAS::External->new(
    cas_url  => URI->new('https://cas-server.example.net'),
    username => 'testaccount',
    password => 'testpassword',
);

my $response = $authen_server->authenticate(
    service => 'https://some-service.example.net/',
);

if (!$response->is_success) {
    print {*STDERR} "Invalid credentials supplied\n";
    exit 1;
}

print $response->ticket_granting_cookie, "\n";

exit 0; |
#!/usr/bin/env perl
use 5.008001;
use strict;
use warnings;
use Authen::CAS::External 0.01;
use URI;
my $authen_server = Authen::CAS::External->new(
cas_url => URI->new('https://cas-server.example.net'),
username => 'testaccount',
password => 'testpassword',
);
my $response = $authen_server->authenticate(
service => 'https://some-service.example.net/',
);
if (!$response->is_success) {
print {*STDERR} "Invalid credentials supplied\n";
exit 1;
}
print $response->ticket_granting_cookie, "\n";
exit 0;
Posted
on 20 May 2009, 19:48,
by Douglas Wilson,
under
Perl.
In versions of Nagios::Plugin::OverHTTP previous to 0.06 the only way to set a timeout on the plugin was to initiate your own LWP::UserAgent and set the timeout on it and pass that to Nagios::Plugin::OverHTTP like:
use LWP::UserAgent;
use Nagios::Plugin::OverHTTP;

my $ua = LWP::UserAgent->new(timeout => 20);
my $plugin = Nagios::Plugin::OverHTTP->new(useragent => $ua); |
use LWP::UserAgent;
use Nagios::Plugin::OverHTTP;
my $ua = LWP::UserAgent->new(timeout => 20);
my $plugin = Nagios::Plugin::OverHTTP->new(useragent => $ua);
So now you can skip the entire custom user agent step unless you actually want a custom user agent:
use Nagios::Plugin::OverHTTP 0.06;

my $plugin = Nagios::Plugin::OverHTTP->new(timeout => 20); |
use Nagios::Plugin::OverHTTP 0.06;
my $plugin = Nagios::Plugin::OverHTTP->new(timeout => 20);
In addition verson 0.07 changes the check_over_http script so that the timeout defaults to 10 seconds, which is reasonable with Nagios plugins.
Posted
on 14 May 2009, 11:20,
by Douglas Wilson,
under
Perl.
Yesterday I finished up some more features to Plugin::Nagios::OverHTTP. Before the only parameter that could be passed was url. Now this parameter can still be passed, but you may also pass other individual parameters, including hostname, path, and ssl. This helps improve the check_over_http utility which would be used in the Nagios checking. Typically the command definition would have been something like the following:
define command{
        command_name check_over_http
        command_line check_over_http --url=$ARG1$ $ARG2$
        }
This means the following would need to be in a service definition:
define service{
        use                            noncritical-service

        host_name                      server1
        service_description            Connection to MySQL
        notes                          Checks if the server can connect to remote MySQL
        check_command                  check_over_http!http://server1/nagios/check_remote_mysql
        }
As you can see, the check command duplicates the hostname, which is not the way of Nagios plugins. Now With version 0.04 and up, we can have the following definitions:
define command{
        command_name check_over_http
        command_line check_over_http --hostname=$HOSTADDRESS$ --path=$ARG1$ $ARG2$
        }
define service{
        use                            noncritical-service

        host_name                      server1
        service_description            Connection to MySQL
        notes                          Checks if the server can connect to remote MySQL
        check_command                  check_over_http!/nagios/check_remote_mysql
        }
This post is a nice how to about making a bootable USB flash drive to install Windows Vista or Windows 7 from. Unless you are using a super fast flash drive, it won’t be much faster than a DVD, but the plus of this method is being able to not use a DVD and to be able to swap out different WIM images for deployment. This guide details the steps using a Windows Vista machine, but should be the same for a Windows 7 machine.
- Insert the USB flash drive you want to use into a USB port on your computer. The standard Windows Vista/7 DVD is about 2.4 GB, so you will want to be sure your flash drive is at least that big. It may need to be bigger depending on if you are using a custom WIM.
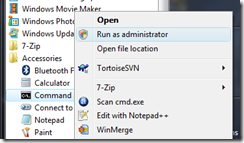
- Open Command Prompt as administrator
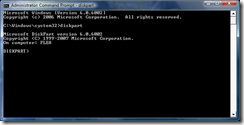
- At the command prompt, you will want to start the diskpart utility by typing diskpart and pressing Enter.
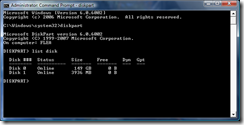
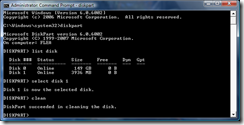
- Type list disk and press Enter and diskpart will list all the disks that are connected to your computer. You can identify which one is your target flash drive based on the size. For this I am using a 4 GB flash drive, so Disk 1 is my target disk.
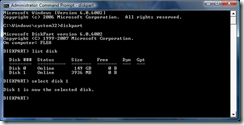
- Now type select disk # and press Enter, replacing # with the disk number you determined from the step above.
- Now it is time to wipe everything from the flash drive. Type the command clean and press Enter.
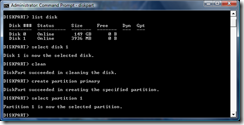
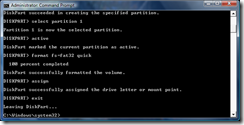
- Now type in the command create partition primary and press Enter. This will create a new primary partition on the drive occupying the entire disk. Once this is done, type select partition 1 to select the partition that was just created.
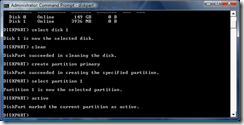
- To make this partition bootable, it needs to be marked as an active partition. To do this, type the command active and press Enter.
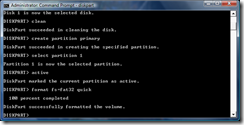
- Now it is time to format the partition. For this, the format will be FAT32. To conserve time, the quick formatting option is desired. Type the command format fs=fat32 quick and press Enter. Because of the quick option, the formatting should take less than 30 seconds.
- After the formatting is complete, the drive should automatically become present in Computer. If not, you may type the command assign and press Enter which will make the drive available in Computer. You may now exit from diskpart using the exit command.
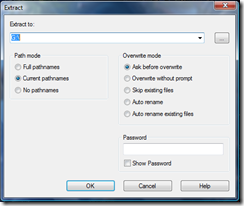
- Now the drive is ready for the installer files to be copied to it. You may copy-and-paste from a DVD in your DVD drive. The following demonstrates how to extract the files from an ISO file to the drive using the 7-Zip program. Just right-click on the ISO file and select 7-Zip and Extract files…

- In Extract to, choose the flash drive. In my case, the flash drive is assigned the letter G, so I am extracting into G:\. Click OK to begin the extraction. Depending on how fast your flash drive is, this may take some time.
- After the extraction, the flash drive is ready to be booted to and can install Windows onto the destination computer.


